Part 2. Basic Info
The Basic Info screen is the first screen in the Event Creation Wizard. This is where you will configure the basic information for your event, as well as the additional types of information you will add for your members.
The Basic Info screen has two (2) sections:
- Basic Information - Basic information for the event, including the date and time.
- Additional Information - Select the types of additional information to add to the event.

Configuring Basic information
Step 1. Add basic information for the event.
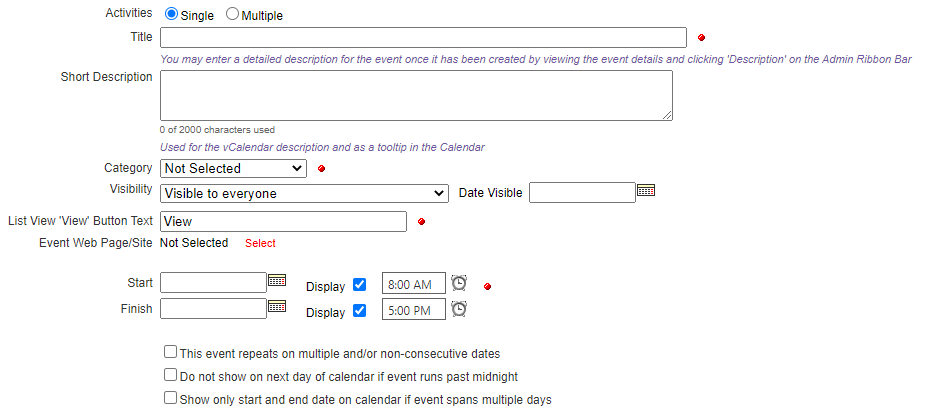
- Activities - Select Single to configure the event as a single-activity event.
Single Vs. Multiple-Activity Events
A single-activity event is one which takes place in one location on one or more days, and attendees will sign up for the entire event. A multiple-activity event can take place at multiple locations over one or more days, and attendees can sign up for individual activities that occur over the span of the event. Each of those activities can have separate registrations and/or fees.
- Title - Enter the title of the event. The title will display on the calendar in both grid and list view.
- Short Description - Enter the short description of the event. The short description will display in list view when the user selects the More Info button in the event.
- Category - Select the category to use for the event. The category will control the color of the event on the calendar in grid view, as well as the color of the date of the event in list view. Members can also find the event by searching for the selected category.
- Visibility - Select the appropriate option.
- Visible to everyone - everyone can view the event on the calendar and view event details.
- Visible to everyone, details for members only - everyone can view the event on the calendar, however only logged-in members can view event details.
- Visible to members only - only logged-in members can view the event on the calendar.
- Not Visible - only administrators can view the event.
- (Optional) Date Visible - Select the calendar icon to display a pop-up date selector. Select the date the event should appear on the calendar. If a date is not selected, the event will be visible as soon as it is created.
Event Visibility and Registration
Visibility settings are different from registration settings. For example, you can allow everyone to view an event, but only allow members to register. On the other hand, if you want non-members to be able to register for the event, be sure to allow them to view the event on the calendar. You will configure registration settings later.
- (Optional) List View 'View' Button Text - Enter the text to display in list view in the button users will select to view more details about the event.
- (Optional) Event Web Page/Site - If the event has an associated existing custom page, photo album, external website, etc., choose the appropriate link to display.
- Select the Select link to view the Build a Link pop-up dialog.

- Link Type and Address
- Custom Page - Link to any custom pages you have created. The next field is a drop-down list of custom pages.
- Photo Album - Link to a photo album, if the Photo Albums module is enabled. The next field is a drop-down list of categories; once you select a category, you can select a photo album within that category.
- External Page – This is a link to a web page stored on another website. The next field will prompt for the External URL, the address of the website you wish to go to.
- Email – The next field will prompt for the Email Address.
- Blog - Link to any blog, if the Blogs module is enabled. The next field is a drop-down list of available blogs.
- Volunteering Opportunity - Link to any volunteering opportunity, if the Volunteering module is enabled. The next field is a drop-down list of available opportunities.
- Add to Mailing List link - Enter a link the allows non-members to add themselves to your organization's mailing list. These non-member contact are also automatically added to your non-member database.
- Link Properties
- Link Display Type - Links can be represented in three ways, using text, a button or an image. If you select Text or Button, the next field prompts for the text to be used. If you select Image, the field is replaced by a button that displays the Image Selector pop-up window, where you can browse your Web Graphics library for images, or upload a new image.
- Target Window - Select Same Window to open the link in the same window as the event. Select New Window to open the link in a new window or tab.
- Select Save to save your changes and return to the Basic Info screen.
- Select the Select link to view the Build a Link pop-up dialog.
- Start and Finish time -
- Date - Select the calendar icon to display a pop-up date selector. Select the start and finish date.
- Display - Select Display to display the start and finish time in the event details.
- Repeating/Multiple Date Options
- This event repeats on multiple and/or non-consecutive dates - If configuring a multiple date event, such as an eight-week course, see the Repeating Dates section. If this option is selected, the Finish date is removed from Basic Info. The final date of the event is configured on the Repeating Dates screen.
- Do not show on next day of calendar if event runs past midnight - Select this option to only show the event on the start date on the calendar.
- Show only start and end date on calendar if event spans multiple days - Select this option to show the event only on the start and end dates if the event spans more than two (2) days.

Step 2. Specify what additional information is needed for this event.
Additional information is added to the event in the pages of the Event Creation Wizard. Select the pages that contain information necessary for the event. In this example, we will leave all boxes checked.
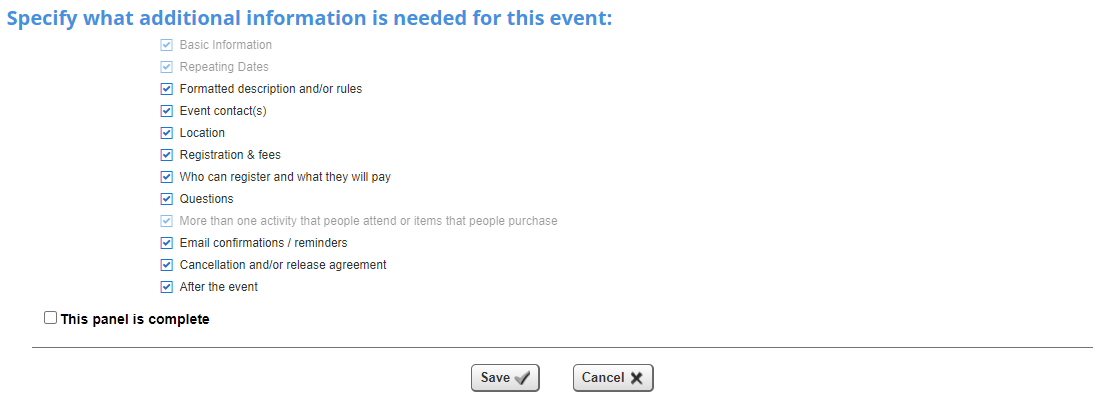
- Basic Information - This is the current page. This page is required.
- Repeating Dates - If the event is a single-date event, this page cannot be selected and is greyed out. If the event is a multiple-date event, the option will be selected automatically.
- Formatted description and/or rules - Add a fully formatted description to the event, with formatted text, photos and links.
- Event Coordinator(s) - Select one or more members to serve as the contact(s) for the event.
- Location - Enter the event location.
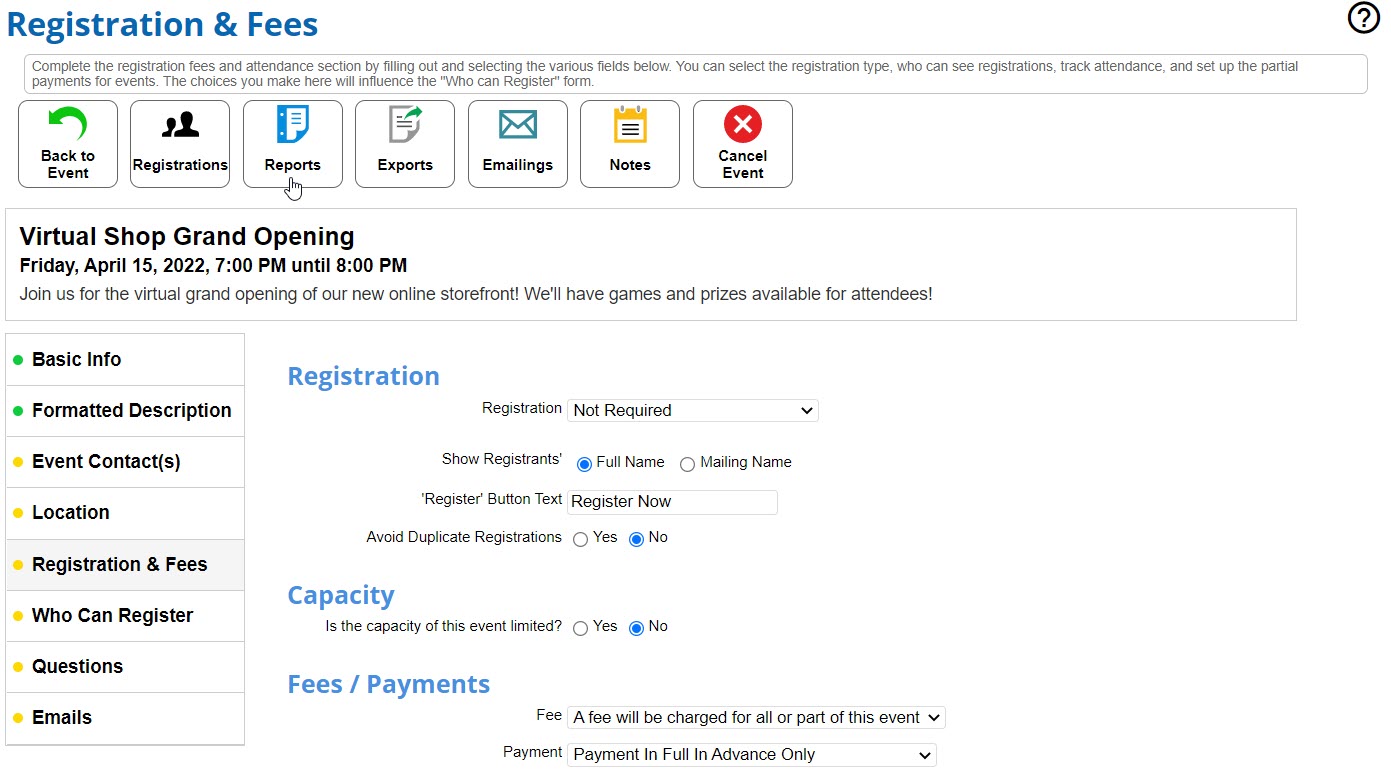
- Registration & fees - Select registration options, and whether or not a fee is required for the event.
- Who can register and what they will pay - Determine who can register for the event, and what each registrant will pay.
- Questions - Ask registrants questions during registration.
- More than one activity that people attend or items that people purchase - If the event is a multiple-activity event, this page cannot be selected and is greyed out. If the event is a multiple-activity event, the option will be selected automatically.
- Email confirmations/reminders - Add additional information to the registration confirmation email, and/or determine when reminder emails are sent.
- Cancellation and/or release agreement - Configure the cancellation policy for the event, and/or the release agreement.
- After the event - Link users to a custom page or photo album dedicated to the event.
Event Creation Wizard Pages
If you select a page to add information to, but decide later you don't need the page you can remove it from the wizard. If you don't choose to add a specific page, for example Location, but later decide you need it, you can add the page back by visiting the Basic Info screen and checking the box.
Default Event Creation Wizard Pages
If you find that you tend to use the same pages most of the time, you can set pages to be selected and unselected automatically in Configure > Event Defaults. For example, if you almost never ask registrants questions, you might want the Questions page unchecked by default. You can still add the page to the Wizard, however the option will be unchecked by default.
Step 3. Select This panel is complete to complete the Basic Info page. Select Save to save your changes and navigate to the Event Admin Screen.
Event Admin Screen
The Event Admin Screen is where you will access each page in the Event Creation Wizard. The Event Admin Screen has three (3) sections:
- Builder Status Menu - Select the menu option to view details for that section. A green dot indicates the panel has been marked as Complete. The menu appears on each page in the Event Creation Wizard, to allow you to easily navigate between pages.
- Editing Area- Select the edit icon at the top left corner to edit the information for that section.
- Admin Icons - The toolbox of icons at the top right of the screen gives you more administrative options, such as viewing registrations, running reports and configuring blast emails for the event.
Step 4. Select the Formatted Description option on the Builder Status Menu, then select the Edit icon in the panel.