Part 6. Registration & Fees
The Registration & Fees screen is where you will select registration options, and whether or not a fee is required for the event. The screen has six (6) sections:
- Registration - Determine whether registration is required, and when users can register.
- Capacity - Determine the number of people allowed to register.
- Fees/Payments - Decide if a fee applies to the event.
- Attendance - Decide if attendance should be recorded for the event.
- Registrant Options - Determine the number of guests a registrant may bring.
- Non-Member Settings - Determine the data collected from non-member registrants.

Default Registration Settings
If you find that you tend to choose the registration settings most of the time, you can configure those settings in Configure > Event Defaults. You can still configure the registration settings differently in individual events.
Configuring Registration Settings
- Registration - Select the appropriate option:
- Not Required - Users will not see a button to register and the event will note that registration is not required.
- Recommended - Users will see a registration button, however registration is not required.
- Required - Users will see a registration button and registration will be required to attend the event. Optionally, select a future date and time registration opens.
- Required By Close Date - Users will see a button and registration will be open until the specified date and time. Select the registration close date and time, and optionally the open date and time.
- Admin/Event Coordinators Only - Only administrators, event calendar coordinators and event coordinators can register users for this event. Users (logged-in members or non-members) cannot register themselves.
- Temporarily Unavailable - Users see a note that registration is temporarily unavailable.
- Closed - Users see a note that registration has closed.
- External - A link button is displayed and users can select it to navigate to another website to register for the event. Use the Build a Link tool to add the appropriate link.

- Registrant List Visibility - Select the appropriate option:
- None - The list of registrants will only be visible to administrators and event coordinators.
- Public - The list of registrants will be visible to members and non-members.
- Members Only - The list of registrants will only be visible to logged-in members.
- Register Button Text - Enter the text to be displayed on the button users will select to register for the event.
- Avoid Duplicate Registrations - Select the appropriate option:
- Yes - If a logged-in member is registering, the system will check to see if the member has registered for the same event previously and prevent the member from registering again. If a non-member is registering, the system will check the non-members email address and last name, If both the non-member email address and last name match, the system will prevent the non-member from registering again.
- No - Any member or non-member can register for the event more than once.

Duplicate Registrations
Avoiding duplicate registrations might seem obvious, but if you want to allow users to register each other for an event, select No. The system will still warn the member or non-member that they have already registered, but they can still go through the process to register a friend. For example, Joe and Sue are members and Joe mentions to Sue that he registered for an event with a limited capacity. Sue isn't able to register right away, so she asks Joe to register her on her behalf.
Configuring Capacity Settings
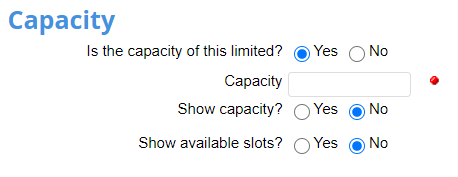
- Is capacity of the event limited? - Select the appropriate option.
- Yes - The event will allow users to register until capacity is reached.
- Capacity - Enter the capacity of the event.
- Show capacity - Show users the maximum number of attendees that can attend the event.
- Show available slots - Show users how many spots are left for registration.
- No - The event will allow users to register until the event has concluded.
Event Waitlist
If you set event registration to either Recommended, Required, or Required by Close Date and you set a registrant capacity, you can enable a Waitlist for the event. See the Waitlist section at the end of this guide for instructions.
Configuring Fees and Payments
Step 3. Fees/Payments
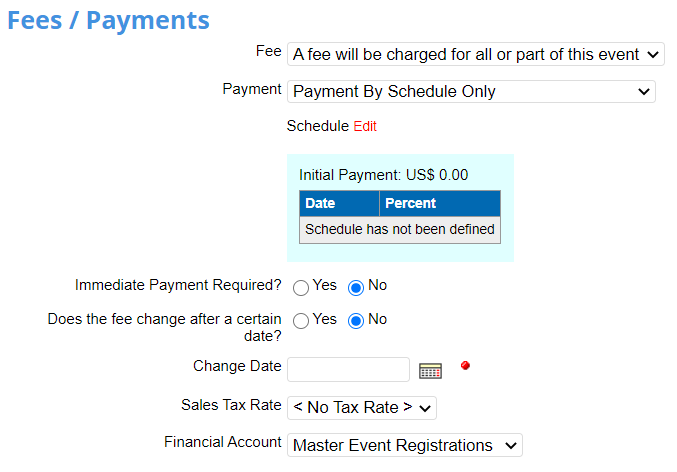
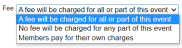
- Fee - Select the appropriate option:
- A fee will be charged for all or part of this event - To attend the event, users must pay a fee.
- No fee will be charged for any part of this event - The event is free to attend.
- Members pay for their own charges - The event is free, but attendees might pay for something at the event on their own.

Members pay for their own charges
Some events or social outings might technically be free to attend, but stating members are expected to pay for their own charges lets members and non-members know that they might need to purchase something at the event. For example, if your organization hosts a networking event at a bar, attending the event might be free, but attendees would pay for their own drinks.
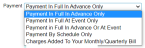
- Payment - Select the appropriate option:
- Payment In Full In Advance Only - In order to attend the event, attendees may only pay in advance.
- Payment In Full In At Event Only - In order to attend the event, attendees may only pay at the event.
- Payment In Full In Advance or At Event - In order to attend the event, attendees can pay either in advance or at the event.
- Payment By Schedule Only - In order to attend the event, attendees must pay specific amounts on a schedule. When you select this option, a new Schedule field appears.
- Select Edit to edit the payment schedule.
- (Optional) Initial Payment - Enter the initial payment required. This payment is due when the attendee registers, followed by the schedule of payments configured in the next step.
- In the payment schedule grid, select the date the first payment is due. Enter the percentage of the total payment that is due on that date. Select Add to add the configured payment to the schedule.
- Repeat the previous step until the TOTAL % Scheduled equals 100%.


Scheduled Payments
When attendees register for an event with a payment schedule, they will receive a reminder email letting them know they have an upcoming payment due.
Charges Added to Your Monthly/Quarterly Bill
This option was added for a club which needed to bill members monthly; avoid selecting this option.
- Immediate Payment Required? - This option will only appear if Payment In Full In Advance Only was selected. Select the appropriate option:
- Yes - Registrants will be required to pay immediately to hold their spot at the event. A pop-up notification will appear on the event registration payment screen warning the user they have 30 minutes to complete payment.
- No - Registrants can wait to pay for the event and exit the payment screen without giving up their registration spot.
Immediate Payment and Alternative Payment Methods
If you want to allow registrants to pay with cash or a check, select No to allow registrants to send in payment without sacrificing their registration spot.
- Does the fee change after a certain date? - Select the appropriate option:
- Yes - Use this to configure "Early Bird" pricing for the event. Select the date the fee change goes into effect.
- No - The fee remains the same regardless of when the user registers.
- (Optional) Sales Tax Rate - If tax must be charged for the event, select the appropriate tax rate. Note the option may be labeled differently depending on the country where your organization is based.
Tax Rates
Configure tax rates for transactions on your website in Control Panel > Money > Tax Rates. Depending on the country in which your organization resides, the option may be labeled Sales Tax, GST, VAT, etc.
- Financial Account - The default financial account for events is Master Event Registrations. If another financial account applies, select the appropriate option.
Financial Accounts
Financial Accounts are different from your bank account listed with ClubExpress and are used to categorize charges on ClubExpress reports. Categorizing charges across your website can be a helpful financial reporting tool. For example, ten members each pay $15 to attend various events hosted by your organization ($150). Five of those members registered for your most popular event of the year, your Yearly Training Seminar ($75). On your bank statement, you will only see a deposit of $150. If you create a separate financial account called Yearly Training Seminar, you could run a report to show that $75 of the $150 deposit came from members signing up for the seminar.
With our QuickBooks® integration, ClubExpress Financial Accounts allow you to link to the financial accounts in your own accounting system.
Configuring Attendance Tracking
Step 4. Attendance
Track Attendance - Select the appropriate option:
- Yes - Administrators and event coordinators will have the option to track which of the registrants attended the event. Attendees who did not register in advance can also be registered and marked attended simultaneously at the event.
- No - Administrators and event coordinators will not be able to mark attendance for the event.
Configuring Registration Options
Step 5. Registrant Options
- Maximum Guests - Enter the maximum number of guests a user may register for the event.
- Mailing List Category - The default mailing list category for events is Event Registrants. If another mailing list category applies, select the appropriate option.
Mailing List Categories
Mailing list categories are a great way to categorize members and non-members. Sometimes this is done automatically, such as when someone registers for an event that has a specific category assigned to it. It can also be done manually, such as when you want to assign someone to a “Press” category you have created to track members of the press. Both members and non-members can have multiple categories assigned to them. For example, a member might have both the volunteer and donor categories applied to them because of past volunteer work and donations.
Configuring Non-Member Guest Data Collection
Step 6. Non-Member Guest Settings
If a non-member registers for an event, or a member or non-member registers a guest for an event, the non-member and/or guest contact information is saved to your non-member contact list and can be accessed in the People Manager.
For each contact item, select the collection method.
- Do Not Show - The field will not be shown on the registration screen.
- Show - The field will be shown on the registration screen.
- Show and Require - The field will be shown on the registration screen and will be required to register.

Step 7. Select This panel is complete, then Save to save your changes and return to the Event Admin screen.
Step 8. Navigate to Who Can Register
Select the Who Can Register option on the Builder Status Menu, then select the Edit icon in the panel.